So, Let’s Get Started.
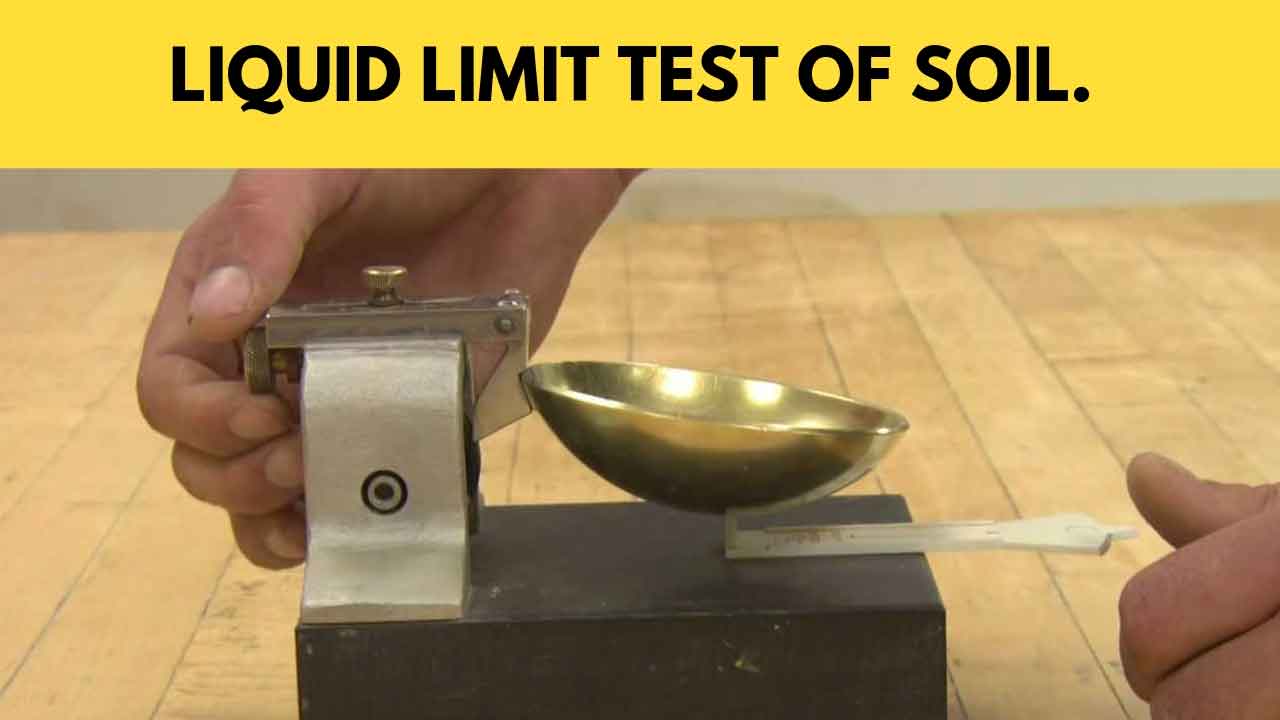
Liquid Limit Test of Soil.
The water content at which the soil starts flowing like a liquid is known as Liquid Limit of Soil.
The test used for determining the liquid limit of soil is known as Liquid Limit Test.
The device used for this test is known as Casagrande.
Scope.
To determine the liquid limit of soil using a mechanical liquid limit device called Casagrande.
Apparatus.
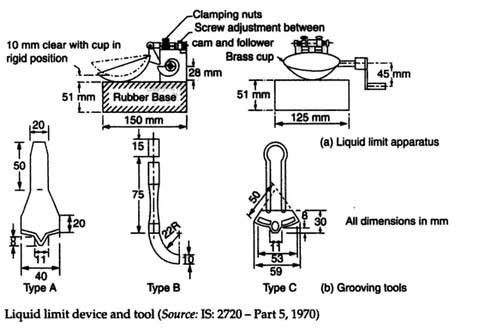
1. Casagrande Device – as illustrated in below Fig. a.
2. Grooving tools – as illustrated in below Fig. b.
3. Evaporating dish.
4. Spatula.
5. Palette knives.
6. A balance of 0.01 g sensitivity.
7. Wash bottle or beaker.
8. Apparatus for water content determination.
Procedure.
1. Clean and check the liquid limit device to see that it is in working order.
Also, clean the grooving tools.
2. Use a gauge or the handle of the grooving tool and the adjusting plate of the liquid limit device (Casagrande) such that the cup falls exactly 10 mm for one revolution of the handle.
After adjustment, secure the plate by tightening the screw.
3. Weigh about 120 grams of the soil sample passing the 425 μm IS sieve and transfer it to an evaporating dish or on to the flat glass plate.
4. Mix the soil with distilled water to form a uniform paste.
5. Take a portion of the paste in the cup (of the liquid limit device) above the spot where the cup rests on the base, squeeze down, spread into position;
and level to a depth of 10 mm at the point of maximum thickness.
6. Divide the soil in the cup by firmly running the grooving tool (Type A) diametrically such that a sharp groove is formed.
Use Type B or C grooving tools for non-adhesive soils.
7. Turn the crank at the rate of two revolutions per second until the two parts of the soil come in contact with the bottom of the groove along a distance of about 12 mm;
and record the number of drops needed.
8. Add a small quantity of soil from the evaporating dish, mix it thoroughly;
and repeat Steps 6 and 7 until two consecutive runs give the same number of drops for the closure of the groove.
9. Take a representative slice of the soil sample, about the width of the spatula, at right angles to the groove;
including that portion of the groove in which the soil flowed together, for water content determination.
10. Transfer the remaining soil to the evaporation dish and add more water or soil to change the consistency of the paste.
Repeat Steps 5 to 9.
Repeat the test 4 to 5 times and record the number of drops required to close the groove in the range of 15 to 35.
Computations and Result.
Plot the number of drops on a logarithmic scale and water content on an arithmetical scale and join them by a straight line.
Such a curve is called a flow curve.
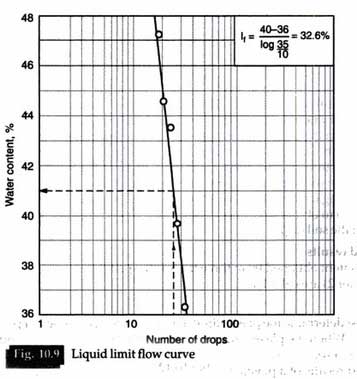
Read the moisture content corresponding to 25 drops from the curve and report it to the nearest whole number as the liquid limit (wL of the soil).
Extend the flow curve on either side and find the slope of the line as the difference in water content at N2 and N1 drops and report it as the flow index If, thus;
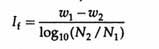
where w1 is the water content corresponding to N1 drops and w2 the water content corresponding to N2 drops.
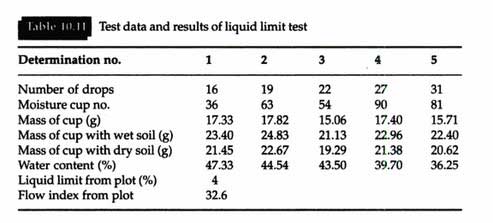
Typical liquid limit test data and results are shown in # Table 10.11 and #Fig. 10.9.
Discussion.
In general, natural soils used for plastic and liquid limit tests should not be oven dried.
Drying causes the particles to sub-divide and also causes the removal of absorbed water.
It is reported (Lambe, 1951) that oven-dried organic soils tend to show a lower wL value than those of soils that have not been dried.
Thus, sometimes natural soils are directly used for a test without oven drying if all the particles are less than 425 μm in size.
In case some stones are present, the wet soil is rubbed through the 425 μm IS sieve till a sufficient quantity of soil is collected to run the test.
A soil with a low clay content has to be tested immediately after thorough mixing with water.
In case of tearing of the sides of the groove or slipping of the soil, the groove may be cut in stages.
Instead of flowing, some soils tend to slide; in such cases discard the result and report that the liquid limit could not be obtained (IS: 2720 – Part 5, 1970).
Another method of finding the liquid limit is the use of the cone penetrometer method.
The mechanical liquid limit device has been recognized as a routine test.
The cone penetrometer has been reported to have more advantages compared with the mechanical device (IS: 2720 – Part 5,1970); yet it has not been accepted as a routine test.
Read Also:
Standard Proctor Test; Its Apparatus, Procedure, Result.
Modified Proctor Test: Its Procedure, Apparatus, Result.
PLEASE I NEED THE COMMENT
PLEASE I NEED THE WEBSITE AND THE COMMENT