In this article, You are going to learn about the Oblique Projection, Oblique Drawing, Its Types, Dimensioning, etc.
So, Let’s Get Started.
Oblique Projection.
This is such type of projection in which two-dimensional drawings are prepared of three-dimensional objects.
This is such type of projection in the drawing of which such projectors are drawn, which are at some angle other than 90° with the plane.
Generally, one view of the object is made parallel to the plane.
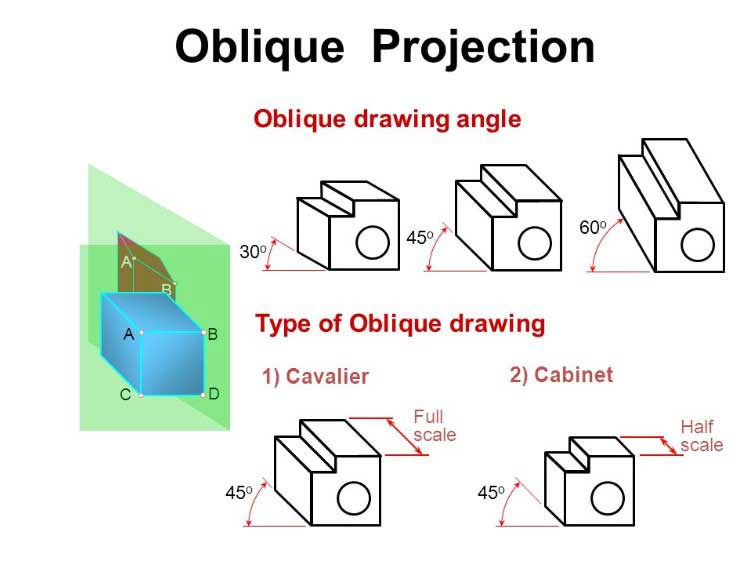
The projection lines are drawn at 45°angle. This view resembles the orthographic projection.
The more detailed side of the object is set toward the bigger angle axis.
In this way, the actual dimension of the shape of the object is shown on it.
The two axes of the side are set perpendicular to each other while the third axis is set at some-suitable angle.
This axis is called Receding Axis.
This axis makes an angle from 30° to 60° with the horizontal axis.
Types OF Oblique Projection.
Following are the two types of oblique projection according to construction.
1. Cavalier Oblique Drawing.
2. Cabinet Oblique Drawing.
1. Cavalier Oblique Drawing:
Mostly this type of drawing is constructed in Oblique Projection. In this drawing, one axis is horizontal, and the other is vertical while the third axis is at 45° to the horizontal line.
2. Cabinet Oblique Drawing:
In this drawing, one axis is horizontal, and the other is vertical while the third axis is from 30° to 60° to the horizontal line.
Such drawing resembles much with the actual image.
The dimensions on the horizontal and vertical axes are given from the actual scale, whereas the scale on the inclined plane is 1/2 or 2/3 of the actual scale.
Orientation OF an Object.
The selection of the direction of an object is very important for making the oblique drawing explanatory.
For this purpose, the longer side of the object is kept along the horizontal axis.
Also, the more detailed and the side having more curves is taken along the horizontal axis.
While the size with fewer details is kept along the receding axis.
Drawing Oblique Projection.
Following method is used for making an oblique projection.
1. First of all orthographic projections are drawn on one side of the sheet.
2. Then all the three axes of the oblique drawing are constructed in which one axis is horizontal, and the other is vertical while the third axis is from 30° to 60° to the horizontal line.
3. At least two views of orthographic projection are selected.
4. Digits like 1, 2, 3,…. are written on the orthographic projection.
5. Projections are completed by placing projectors parallel to the axes of orthographic views.
6. The remaining details like circles, arcs, etc. are constructed on the sides, and extra lines are erased.
7. Dimensions are written on the external surfaces.
8. Notes and other specifications are written along the receding axis.
Dimensioning of Oblique Drawing.
Dimensioning of the oblique drawing is similar to that of isometric drawing.
Mostly, dimensioning is done along the receding axis.
The angle of writing is also according to this axis. In addition to this, to write more dimensions, sides can be used.
For writing, more dimensions see the following important precautions.
1. All the dimensions are given on the external sides.
2. The dimension is written at such a place where it is easily read.
3. Important specifications and notes are written along the receding axis at the same angle.
4. If all dimensions are not possible along the receding axis, then these can be given on the upper side of the view.
5. Dimension lines are drawn parallel to the axis.
Read Also: Auxiliary View – Its Types, Methods. [A Comprehensive Guide].
Read Also: Estimation of Building – Long Wall Short Wall, Center Line Method.
Thanks! for Reading this article. Please, Don’t forget to share it.
Min ß öç äüïë ß
lzçñvbß