Atterberg Limits.
In 1911, the Swedish agriculturist Atterberg divided the entire range of soil state (from liquid to solid state) into four stages, which is known as Atterberg Limits or Consistency Limits.
1. The liquid state,
2. The plastic state,
3. The semi-solid state, and
4. The solid state.
He set arbitrary limits, known as consistency limits or Atterberg limits, for these divisions in terms of water content.
Thus, the consistency limits are the water contents at which the soil mass passes from one state to the next.
The Figure below shows the four states of consistency, with the appropriate consistency limits.
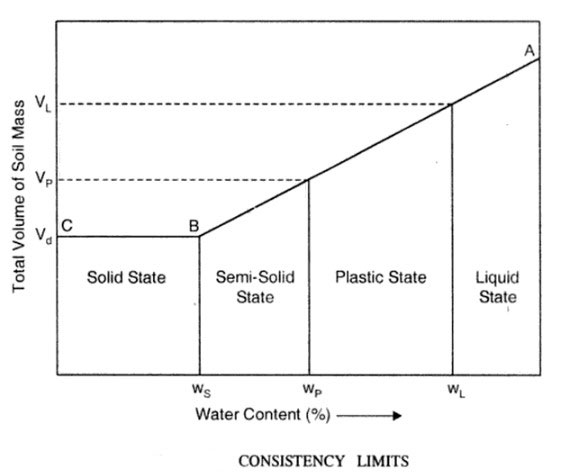
The Atterberg limits which are most useful for engineering purposes are the liquid limit, plastic limit, and shrinkage limit. These limits are expressed as percent water content.
Liquid Limit.
Liquid Limit is defined as the minimum water content at percent on dry bases at which the soil changes its state from Liquid to Plastic State.
With reference to the standard liquid limit device, it is defined as the minimum water content at which a part of soil cut by a groove of standard dimensions, will flow together for a distance of 12 mm under an impact of 25 blows in the device.
Plastic Limit.
Plastic Limit is defined as the minimum water content at percent on dry bases at which a soil enters from Semi-Solid State to Plastic State.
Shrinkage Limit.
Shrinkage limit is defined as, the maximum water content at which a reduction in water content will not cause a decrease in the volume of a soil mass.
It is lowest water content at which soil can still be completely saturated.
Plasticity Index.
The range of consistency within which a soil exhibits plastic properties is called plastic range and is indicated by plasticity index.
The plasticity index is defined as, the numerical difference between the liquid limit and the plastic limit of a soil: P.I = LL – PL.
In the case of sandy soils, the plastic limit should be determined first. When plastic limit cannot be determined, the plasticity index is reported as NP (non-plastic).
When the plastic limit is equal to or greater than the liquid limit, the plasticity index is reported as zero.
Plasticity.
Plasticity is defined as that property of a soil which allows it to be deformed rapidly, without rupture, without elastic rebound, and without volume change.
According to Goldschmidt theory, the plasticity is due to the presence of thin scale like particles which carry on their surfaces electro-magnetic charges.
Water molecules are bi-polar and orient themselves like tiny magnets in the magnetic field next to the surface of the soil particles.
Water becomes highly viscous near the particles, but as the distance increases, the viscosity of water decreases until at some distance ordinary water exists.
When enough water is present (corresponding to the plastic state of consistency), the particles are separated by molasses-like water which allows particles to slip past each other to new positions without any tendency to return to their former positions, without change in volume of voids, and without impairing the cohesion.
The correctness of Goldschmidt’s theory for the cause of plasticity is evidenced by the fact that clay does not become plastic when mixed with a liquid of non-polarizing molecules like kerosene.
Read Also: What is Bearing Capacity of Soil? & How to improve it?
Consistency Index .
The consistency index or the relative consistency is defined as, The ratio of the liquid limit minus the natural water content to the plasticity index of a soil: C.I = LL – W / PI
where w is the natural water content of the soil.
Consistency index is useful in the study of the field behavior of saturated fine grained soils.
Thus, if the consistency index of a soil is equal to unity, it is at the plastic limit.
Similarly, a soil with CI equal to zero is at its liquid limit. If it exceeds unity, the soil is in a semi-solid state and will be stiff.
A negative consistency index indicates that the soil has a natural water content greater than the liquid limit and hence behaves just like a liquid.
Liquidity Index.
The liquidity index or water-plasticity ratio is the ratio, expressed as a percentage, of the natural water content of a soil minus its plastic limit, to its plasticity index:
LI = W – PL / PI.
where w is the natural water content of the soil.
Determination of Liquid Limit of Soil.
The liquid limit is determined in the laboratory with the help of the standard liquid limit apparatus designed by Casagrande.
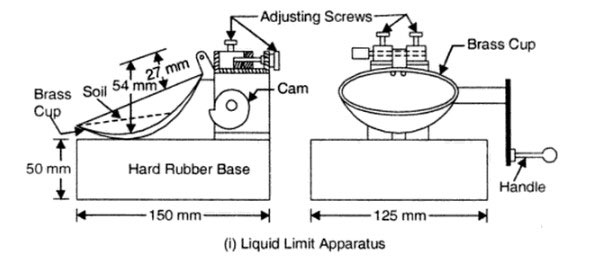
The apparatus consists of a hard rubber base of B.S. hardness 21-25, over which a brass cup drops through the desired height.
The brass cup can be raised and lowered to fall on the rubber base with the help of a cam operated by a handle.
The height of fall of the cup can be adjusted with the help of adjusting screws.
Before starting the test, the height of fall of the cup is adjusted to 1 cm.
Two types of grooving tools are used;
(i) the Casagrande (BS) tool, and
(ii) the ASTM tool.
The IS: 9259-1979 designates these tools as grooving tool.
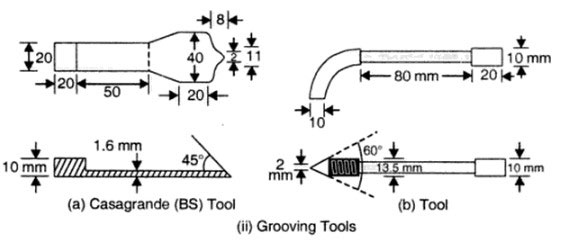
The Casagrande tool cuts a groove of size 2 mm wide at the bottom, 11.0 mm wide at the top, and 8 mm high.
While the ASTM tool cuts a groove 2 mm wide at the bottom, 13.6 mm at the top, and 10 mm deep.
The ASTM tool is used only for more sandy soils where the Casagrande tool tends to tear the sides of the groove.
Apparatus.
1. Casagrande appratus.
2. Sieve No. 40 (ASTM).
3. Spatula.
4. Containers.
5. Tray.
6. Electric Oven.
7. Balance.
Procedure.
1. About 120 g of the specimen passing through 425 micron sieve is mixed thoroughly with distilled water in the evaporation dish or on a marble plate to form a uniform paste.
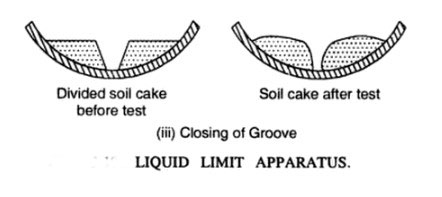
2. A portion of the paste is placed in the cup over the spot where the cup rests on the base, squeezed down and spread into position and the groove is cut in the soil pat.
3. The handle is rotated at a rate about 2 revolutions per second, and the number of blows is counted until the two parts of the soil sample come into contact at the bottom of the groove along a distance of 10 mm.
Some soils tend to slide on the surface of the cup instead of the flowing. If this occurs, the result should be discarded, and the test repeated until flowing does not occur.
4. After recording the number of blows, approximately 10 gram of soil from near the closed groove is taken for water content determination.
Since it is difficult to adjust the water content precisely equal to the liquid limit when the groove should close in 25 blows, the liquid limit is determined by plotting a graph between the number of blows as abscissa on a logarithmic scale and the corresponding water content as ordinate.
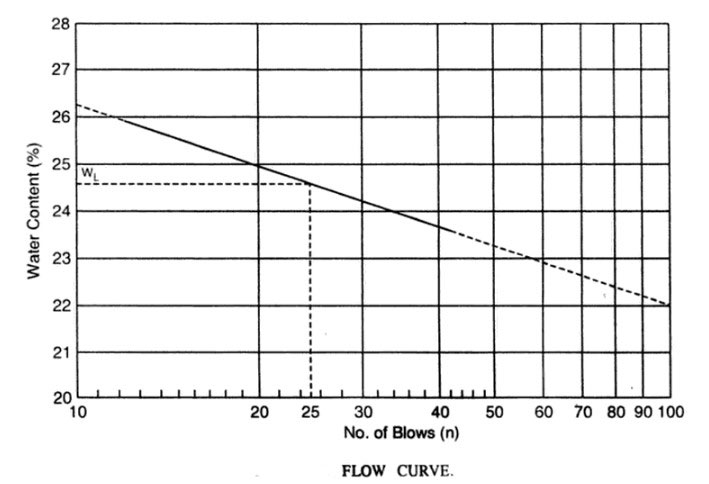
For plotting the flow curve, at least four to five sets of reading in the range of 10 to 50 blows should be taken.
The water content corresponding to 25 blows is taken as the liquid limit.
Watch the Video Below for Better Understanding.
Determination of Plastic Limit of Soil.
Apparatus.
1. Glass plat (2 x 2 feet).
2. Spatula.
3. Sieve No. 40 (ASTM).
4. Electric oven.
5. Balance.
Procedure.
1. To determine the plastic limit, the soil specimen, passing 425 micron sieve, is mixed thoroughly with distilled water until the soil mass becomes plastic enough to be easily molded with fingers.
2. The plastic soil mass should be left for enough time to allow water to permeate through the soil mass.
3. A ball is formed with about 8 g of this plastic soil mass and rolled between the fingers and a glass plate (or marble plate) with just sufficient pressure to roll the mass into a thread of uniform diameter throughout its length.
4. When a diameter of 3 mm is reached, the soil is re-molded again into a ball.
5. This process of rolling and re-molding is repeated until the thread starts just crumbling at a diameter of 3 mm.
6. The crumbled threads are kept for water content determination.
7. The test is repeated twice more with fresh samples.
8. The plastic limit (PL) is then taken as the average of three water contents.
The plasticity index is calculated from the relation: PI = LL – PL.
Watch the Video Below for Better Understanding.
Determination of Shrinkage Limit of Soil.
An expression of the shrinkage limit of soil can be derived with reference to the below figure.
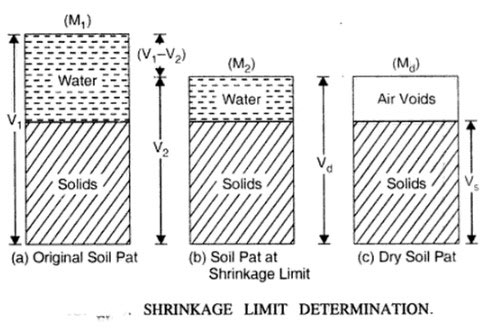
If a saturated soil sample is taken (having water content more than the shrinkage limit) and allowed to dry up gradually,
its volume will go on reducing till a stage will come after which the reduction in the soil water will not result in further reduction in the total volume of the soil sample.
The water content corresponding to that stage is known as the shrinkage limit.
The form of above equation immediately suggests the method of determining the shrinkage limit in the laboratory.
Apparatus.
The equipment for the determination consists of
(i) a porcelain evaporating dish, about 12 cm in diameter with a flat bottom,
(ii) a stainless steel shrinkage dish, 45 mm in diameter and 15 mm in height, with a flat bottom.
(iii) two glass plates, each 75 x 75 mm, one of plain glass and the other having three metal prongs, and
(iv) a glass cup 50 mm in diameter and 25 mm in height, with its top rim, ground smooth and level.
Watch the Video Below for Better Understanding.
Procedure.
1. The volume V1 of the shrinkage dish is first determined by filling it to overflow with mercury, removing the excess by pressing a flat glass plate over its top and then taking the mass of the dish filled with mercury.
2. The mass of the mercury contained in the dish, divided by its density (13.6 g/cm3) gives the volume of the dish.
3. About 50 g of soil passing 425 microns IS sieve is mixed with distilled water sufficient to fill the voids completely and to make the soil pasty enough to be readily worked into the shrinkage dish without the inclusion of air-bubbles.
4. The inside of the shrinkage dish is coated with a thin layer of Vaseline.
5. A volume of wet soil of about one-third the volume of the dish is put in its center, and the soil is caused to flow to the edges by tapping it gently on a hard surface.
6. The dish is gradually filled by adding more soil in installments followed by gently tapping to exclude the inclusion of air.
7. The excess soil is struck off with a straight edge, and all soil adhering to the outside of the dish is wiped off.
8. The dish filled with soil is then immediately weighed.
9. The mass M1, of the wet soil pat, of volume V1, is thus known by subtracting the mass of the empty dish from the mass of the wet soil plus the dish taken above.
10. The dish is then placed in the oven. The soil pat will have volumetric shrinkage on drying, as shown in the Figure (b). The mass Md of the dry soil pat is found.
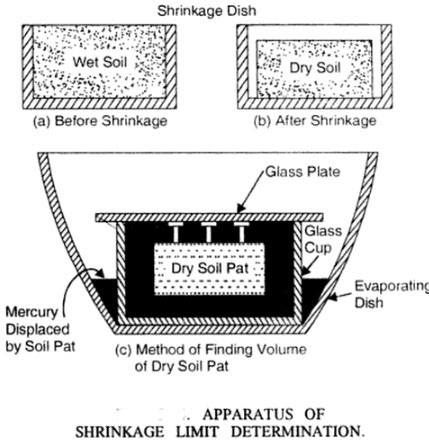
11. To find the volume Vd of the dry soil pat, the glass cup is first filled with mercury, and the excess mercury is removed by pressing the glass plate with three prongs firmly over the top of the cup.
The cup is wiped off any mercury which may be adhering to its outside surface and is placed in the evaporating dish.
The dry soil pat is placed on the surface of the mercury of the cup and is carefully forced down by means of glass with prongs.
The mass of the mercury so displaced divided by its density gives the volume Vd of the dry soil pat.
The shrinkage limit is then calculated from the below Equation.
Thanks for Reading. Don’t Forget to share it.
Read More: Standard Penetration Test (PST) of Soil – Procedure, Tools, Precautions.