So, Let’s Get Started.
Unconfined Compression Test.
The unconfined compression test is by far the most common, cheap and fastest method for soil shear testing.
The unconfined test is used for cohesive, saturated soils.
This test is inappropriate for dry sand or crumbly clays.
This is essentially a special case of the triaxial compression test where the minor principal stress is zero.
The test may be carried out in the laboratory or at the field.
In the laboratory, the standard triaxial apparatus can be used without a perspex cylinder.
Generally, a membrane is not needed, but it is sometimes used to prevent the sides of the specimen from drying.
A field apparatus is also available to obtain the unconfined compressive strength from calibrated charts.
The apparatus is shown diagrammatically in below figure.
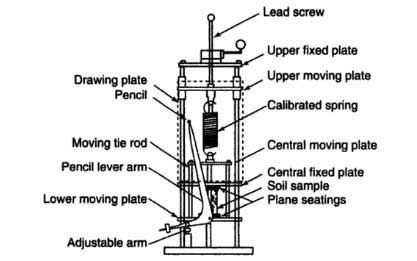
The strain-controlled unconfined compression test is used universally.
The test is somewhat sensitive to the strain rate and can be performed only in a strain-controlled machine.
However, a stress-controlled test may show an erratic strain response due to incremental changing of loads.
The shear strength obtained from the unconfined compressive strength is not very reliable for at least three reasons:
1. The lateral restraint present in the field is not properly simulated in the laboratory.
2. There is no control over the internal soil conditions (degree of saturation, pore water pressure, etc.).
3. The end platens because of lateral restraint alter the internal stresses.
Purpose.
Unconfined Compression Test is used to determine the unconfined compressive strength of cohesive soil.
Apparatus.
1. Unconfined Compression Testing machine (strain controlled).
2. Sampling Tube.
3. Sample Ejector.
4. Deformation dial gauge – 0.01 mm graduations and specific travel to permit 20% axial strain.
5. Vernier Caliper – of least count 0.1 mm.
6. Timer.
7. Oven with accurate temperature control in the range 110°C +- 5°C.
8. A balance of 0.01 gm sensitivity.
9. Miscellaneous equipment such as specimen trimmer, carving tools, re-molding apparatus, moisture cup, etc.
Procedure.
(a) Preparation of test specimen.
Undisturbed, compacted, or re-molded specimens may be prepared, depending on the case.
1. Prepare undisturbed cylindrical specimens (38 mm diameter, 76 mm length) from large undisturbed field samples using a trimmer.
Alternatively, directly obtain field samples in thin sampling tubes of the same diameter as that of the specimen.
Obtain the required length by ejecting the sample through a split mold.
2. Prepare a re-molded compacted specimen, of any predetermined water content and density, in a large mold and then cut it using the sampling tube.
Alternatively, prepare a re-molded specimen from a failed undisturbed specimen by pushing the soil inside a split mold, with the same void ratio and natural water content.
3. In both the cases, the wet density and water content of the specimens are determined.
(b) Compression test.
4. Measure the dimensions of the specimen.
Weigh the specimen and keep representative samples for water content determination.
5. Place the specimen on the bottom plate of the loading device and adjust the upper plate to make contact with the specimen.
6. Adjust the deformation and proving ring dials to zero and apply the axial load with a strain rate of 0.5% to 2% per minute.
7. Record the force and deformation readings at suitable intervals, with closer spacing during the initial stages of the test.
8. Apply the load until the failure surfaces have definitely developed or until an axial strain of 20% is reached.
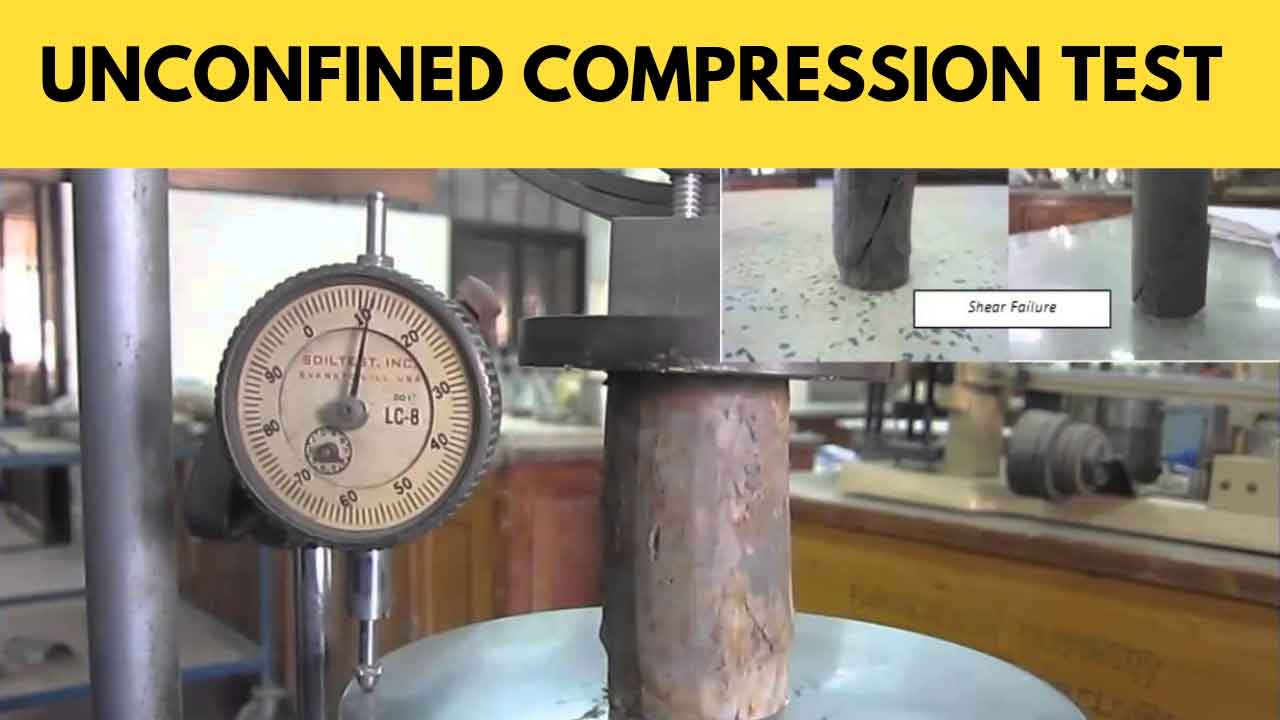
9. Carefully sketch the failure pattern, and if the specimen has failed with a pronounced failure plane, measure the angle of the failure surface with the horizontal.
10. Take water content representative samples from the failure zone of the specimen.
Computations.
Stress-strain values are calculated as;

Where, ΔL is the change in the specimen length (mm) and Lo the initial length of the specimen (in mm).
The average cross-section area A at a particular strain is given by;

where, Ao is the initial cross-sectional average area of the specimen.

where, P is the compressive force.
Plot σ1 versus ε and obtain the maximum stress which gives the unconfined compressive strength qu.
In case no pronounced peak is observed, take the strength corresponding to 20% strain as the unconfined compressive strength.
For φ = 0 conditions, the shear strength or cohesion of the soil may be taken to be equal to half the unconfined compressive strength.
Results.
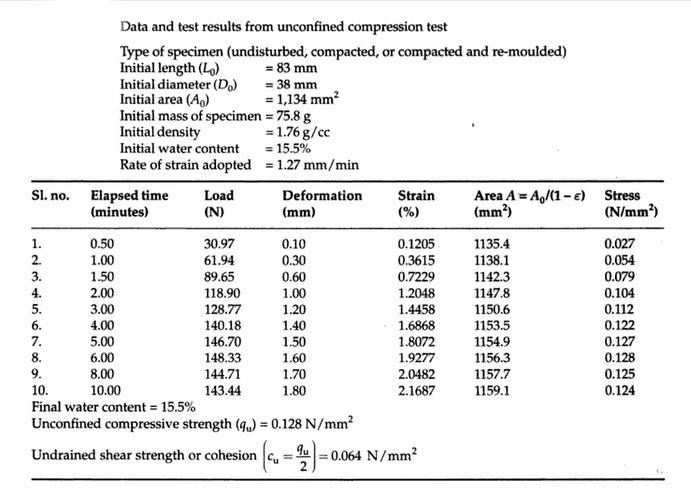
The observations made during the test are recorded as shown in the data sheet for a typical case (below figure).
Merits of Unconfined Compression Test.
The following are the merits of the unconfined compression test:
1. This is the simplest test for determining the undrained shear strength of soil.
2. A quick test and field apparatus gives a fast determination of undrained strength.
Demerits of Unconfined Test.
The following are the demerits of unconfined compression test.
1. Fissured samples may not give reliable results because there is no confining pressure to close the fissures.
2. Samples with high sand content give unreliable results.
Read Also:
Determination of Field Density Test of Soil by Core Cutter Method.
Determination of Particle Size Distribution of Soil by Sieve Analysis.
Thanks
your content is too good.
thanks for the information.