So, Let’s Get Started.
Orthographic Projection.
This is such a type of drawing in which Parallel Projection is used for the preparation of the drawing of an object.
These lines are perpendicular to the plane.
In this drawing, it is assumed that the object is at infinity.
The shape of an object is seen in actual size in such drawing.
A plane is an imaginary surface on which pictures are prepared imaginably. Then it is transferred to the paper.
This plane is faced toward the object whose view is to be prepared.
Generally, three views of an object are prepared. These are Top View, Front View, and Side View.
If the plane is kept in a vertical position, then it is called the vertical plane.
If the plane is kept in a horizontal position, then it is called the horizontal plane.
The plane, horizontal or vertical, which are kept perpendicular to each other are called Principal Planes.
These include the Frontal Plane, Profile Plane, and Horizontal Plane: In addition to this, if a plane is placed at any other place, then it is called Auxiliary Plane.
These are used to draw inclined surfaces of an object. If these are placed in such a way that they form four Quadrants, then this figure is called Dihedral angle.
If these are placed in such a way that they form eight quadrants, then this figure is called Trihedral angle.
If the first Quadrant is used to draw the projections, then this system is called First Angle System.
If the third quadrant is used, then this system is called the Third Angle System.
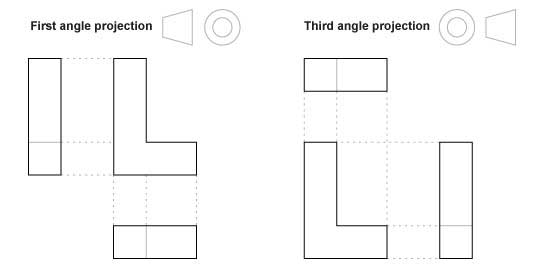
In the First Angle System, the top view is placed below while the front view is upward and the side view is by the side of the front view.
In the Third Angle System, the top view is upward while the front view is downward and the side view is towards, aside from the front view.
Views of Orthographic Projection.
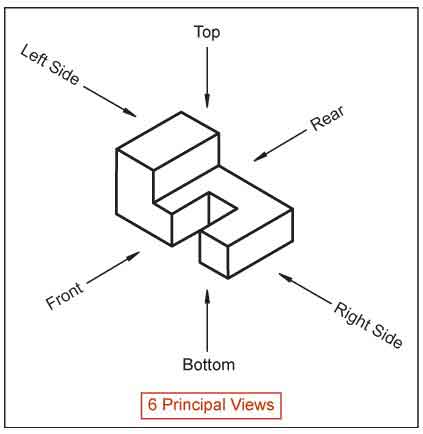
Following views are formed of an object in Orthographic Projection.
1. Front View.
2. Top View.
3. Back View.
4. Bottom View.
5. Right Side View.
6. Left Side View.
Generally, the Following Three views are prepared in the orthographic drawing.
1. Front View:
This view is prepared by placing the object in front. The length and height of an object are shown in this view.
2. Top View:
This view is prepared by looking to the object from the upper side. The length and breadth of the object are shown in it.
3. Side View:
This view is prepared by looking to the object from the right side or left side. The breadth and height of the object are shown in it.
Principal Plane.
A plane is an imaginary and invisible clear surface. The drawing constructed on this imaginary curtain is transferred on the drawing sheet.
For example, if we look at some object through glass or plastic piece, then the picture of the object will be seen there.
This piece will work as a plane.
However, this plane is not a material body.
It is only an imaginary curtain, which is used to give the shape of a drawing by placing it in different positions.
This plane can be put in different positions.
However, the plane placed in the following positions is called the Principal Plane.
Besides such positions, the plane will be called Auxiliary Plane.
1. Frontal Plane.
2. Profile Plane.
3. Horizontal Plane.
1. Frontal Plane.
Such a plane which is placed in front of an object, while projections are drawn, is called the Frontal plane.
2. Profile Plane.
Such a plane which is placed to the right or left of an object. Side view of the object is drawn on this plane.
3. Horizontal Plane.
This is a plane which is placed upward or downward in the horizontal position of an object. Top view of the object is constructed on this plane.
Drawing of Orthographic Projection.
For drawing Orthographic Projection, different planes are placed in a particular order.
Then a specific view is drawn through every plane.
A plane is placed in the following two Methods.
1. Dihedral Angle.
2. Trihedral Angle.
1. Dihedral Angle.
In this method, two principal planes are kept perpendicular to each other. One of these planes is Frontal, while other is horizontal.
Four right angles are obtained in this way which is called Dihedral Angle.
Each right angle is called a quadrant. The object is placed in any of these right angles to take orthographic projection.
The front view is taken on the frontal plane, and the top view is taken on the horizontal plane.
Profile plane is used to take side views.
This plane is held perpendicular at the ends of the other two planes.
2. Trihedral Angle.
In this method, all the three Principal planes are taken perpendicular to one another, and eight right angles are formed.
Thus, these are called Trihedral angle.
Each right angle is called an Octant. An object is placed in any of these right angles to take orthographic projection.
The front view is taken on the frontal plane, and the top view is taken on the horizontal plane. Profile plane is used to take side views.
Systems of Orthographic Projection.
To prepare an orthographic drawing, the selection of one quadrant of dihedral and or one octant of a trihedral angle is made.
In this way the following four systems are formed:
1. First Angle System.
2. Second Angle System.
3. Third Angle System.
4. Fourth Angle System.
Generally, First Angle System and Third Angle System are used. It is because in the Second Angle System and Fourth Angle System, the lines of views of the object overlap.
Therefore, clear pictures cannot be obtained.
1. First Angle System:
The views of an object should be taken by placing it in the first quadrant of dihedral and or first octant of a trihedral angle.
Such a system is called First Angle System.
By taking the Front view on the frontal plane, top view on the horizontal plane and side view on the Profile plane, the planes are then straightened by rotation.
In this way, the front view comes over the top view; side view comes beside the front view.
Characteristics of First Angle Projection:
1. Front view always comes over the top view.
2. Top view always comes under the front view.
3. Right side view always comes to the left at the front view.
4. Left side view always comes to the right of the front view.
5. The view is always in opposite direction to the observer.
6. The object is always in the middle of the view and the observer.
2. Third Angle System.
If the views of an object are taken by placing it in the third quadrant of dihedral or third octant of a trihedral tingle.
Such a system is called Third Angle System.
Here, front view forms on the frontal plane, top view forms on the horizontal plane and side view forms on the profile plane.
After making the views, the planes are set straight by rotation.
In this way, the top view comes over the front view, while side view forms by the side of front view.
Characteristics of Third Angle Projection:
1. Top view always comes over the Front view.
2. Front view always comes under the top view.
3. Right side view always comes to the right of the front view.
4. Left side view always comes to the left of the front view.
5. The view is always formed to the side of the observer.
6. The view is always in the middle of the object and the observer.
Rules of Orthographic Drawing.
Following rules should be followed while forming orthographic drawing.
1. Front view and top view always form over/under each other.
2. The front view shows the length and height of an object.
3. The side view shows the breadth and height of an object.
4. The top view shows the length and breadth of an object.
5. Side view always forms beside the front view.
6. Projection line always forms by the meeting of two surfaces.
7. The hidden detail of an object is always shown by dotted line.
Selection of View.
Following points should be kept in mind at the selection of view,
1. The more detailed view should be selected.
2. The selection of view with maximum detail should be made.
3. The selection of view with more internal details should be made.
4. The selection of view of required details should be made.
Read Also:
Auxiliary View – Its Types, Methods. [A Comprehensive Guide].
Dimensioning – Its Types, System, Principles. [A Comprehensive Guide].


I was thought in jss3 in junior secondary school mpape abuja
thank u so much for under
standing well.
I am well satisfied with your work.
Funtastic, short but sweet and simple explanation on basics of orthographic projections.
Few more examples of the projections could have broaden the imagination capability of the viewers.
wow
Thanks for your good work keep it up
Rule of Orthographic projection is not covered here. Why horizontal plane has to be rotated by 90 deg. in clockwise direction?
Thanks!!. I really understood. My B.tech teacher( Mr.D.P) does not really explain but this is fantastic.