Construction projects generate waste—tons of it. From busted-up drywall and old flooring to pallets, packaging, and scrap, trash adds up fast. That’s why having the right dumpster solution at each phase is key. You’ll save time and money while avoiding a site full of debris.
Let’s break it down phase by phase so you know what to expect and how to plan for it.
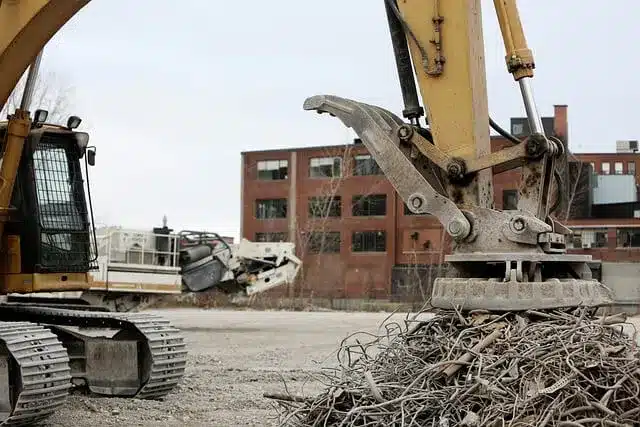
Demolition Phase
Demolition gets messy. You’ll deal with chunks of concrete, broken brick, twisted metal, and piles of wood. This kind of debris is heavy and dense. You can’t just toss it all into any old bin.
You need a dumpster built to handle weight. Go with a roll-off container that’s rated for heavy-duty materials. A 20, 30, or 40-yard dumpster is ideal, depending on the size of your tear-down. If you’re working in North Carolina, a Wilson dumpster rental gives you access to these larger bins with quick local delivery.
Once you’ve selected the right bin, position the dumpster where machines can load directly into it. That cuts down on labor and keeps things moving. Schedule hauls in advance, especially if your team’s working fast. You don’t want demolition stalling because the dumpster’s full.
Site Prep and Cleanout
Before construction can start, you’ll need to clear the site. This includes land clearing, tree removal, and digging for utilities. That means organic debris, trash, and general site junk.
At this stage, you might not need a massive bin. Smaller dumpsters work well, especially when space is tight. Or, go with multiple containers: one for organic debris, one for scrap, and one for trash. It helps with sorting and saves on disposal fees.
Don’t forget to coordinate pickups. If site prep overlaps with demolition or framing, you’ll need more frequent service.
Framing and Building
Once framing begins, waste shows up daily. Lumber scraps, drywall offcuts, insulation, and product packaging start piling up. If you wait too long to schedule a dumpster, your crew ends up working around clutter, which is a safety risk on construction sites.
This phase benefits from a steady, reliable dumpster setup. Choose a mid-size container and place it where workers can easily access it. You’ll want it near the main work area but out of the way of delivery zones.
Think ahead. If you’re dealing with multiple crews or a tight timeline, one dumpster might not cut it. Add a second one to keep the site tidy and efficient.
Renovation and Interior Work
Renovations don’t always create the same level of waste as demolition, but they’re still messy. You’ll have old cabinetry, appliances, tile, carpet, and damaged fixtures. And if it’s a room-by-room job, debris trickles out steadily.
This is where flexible rental terms prove valuable. You might need a smaller dumpster on-site for an extended period. Look for a provider that offers extensions without big fees. Also, consider bins with walk-in doors. They’re easier to load and safer for tossing bulkier items.
Reuse when you can. Salvaging trim, doors, or lumber cuts down on disposal and might save you money on new materials. Just keep the dumpster close to the active work zone so your crew isn’t hauling debris far.
Finishing and Landscaping
Once the walls are up and the paint is dry, it’s not over yet. You’ll still need to toss out leftover flooring, baseboards, empty paint cans, and packing material. Add landscaping and the job site’s a mess again.
This is when a smaller dumpster or cleanup bin makes sense. Switch from a large roll-off to a more compact option. You won’t need as much space, but you’ll appreciate the convenience.
Dispose of any hazardous materials responsibly. That includes paint, chemicals, and treated lumber. Your dumpster provider can guide you on how to handle those properly. Don’t assume it can all go in the bin.
How to Make the Most of Your Dumpster Rental
Want to avoid headaches and extra charges? Here’s how:
- Don’t overfill: Weight limits are strict. Going over could lead to steep fees.
- Sort materials: Some items can be recycled, like metal and clean wood. Sorting helps reduce what you send to the landfill.
- Protect your space: If you’re working in a residential area, use boards or pads under the dumpster. It prevents damage to driveways or lawns.
Communicate with your dumpster provider. Let them know your timeline and the type of work. A good one will help you plan each phase and make adjustments as your project evolves.
Parting Words
Dumpsters aren’t just for the beginning or end of a job. You need them throughout the entire construction process, from demolition to the final sweep. Match the right container to each phase, and the whole project runs smoother—less mess, fewer delays, and a safer site.