In this article, You’ll learn about the Auxiliary View – Its Types, Methods, and how to draw it.
So Let’s Get Started.
Auxiliary View.
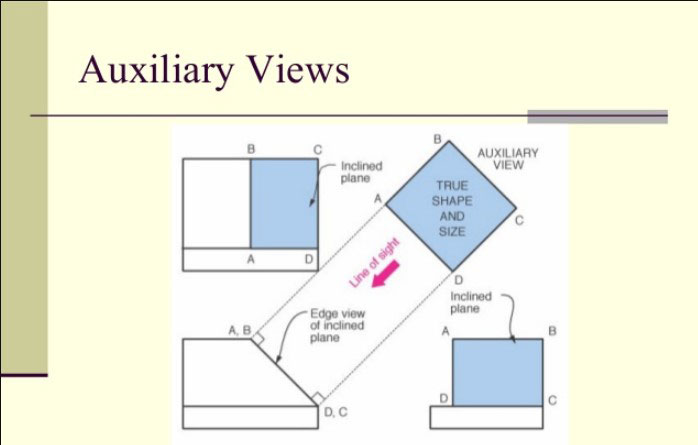
While drawing orthographic projection, such lines of the object which are parallel to principal or vertical plane are represented better.
Those lines which are inclined to the principal plane do not show the actual length.
In this case, the drawing is prepared by placing the plane parallel to the inclined surface.
Such a plane is called Auxiliary Plane.
The drawing made on this plane is called Auxiliary View.
The size and shape of this drawing are actual ones.
The auxiliary plane is assumed to be parallel to the inclined surface.
If this plane is perpendicular to some principal plane, then the drawing on such drawing is called Primary Auxiliary Views.
If the auxiliary plane is not perpendicular to any principal plane, then the shape formed on such plane is called Secondary Auxiliary Views.
Auxiliary views are prepared with respect to some Reference Line.
If the auxiliary view lies uniformly on both sides of the reference line, then it is called Symmetrical Auxiliary Views.
While, if it lies on one side only of the reference line, then it is called Unilateral Auxiliary Views.
If the auxiliary view does not uniformly lie on both sides of the reference line, then it is called Bilateral Auxiliary Views.
Method of Preparation of Auxiliary Views.
Orthographic projections are prepared before preparing auxiliary views.
The view in which inclined lines show actual length, perpendiculars are erected there with the inclined lines to obtain the actual length.
The breadth and other details are collected from the other view.
Generally, the detail of the inclined surface is given in the auxiliary view. The other parts in the principal plane are ignored.
Such an auxiliary view is called Partial Auxiliary View.
If a complete auxiliary view is prepared, then the detail of the inclined surface does not appear fully.
That is why a complete auxiliary is not prepared.
Don’t forget to watch the video below.
1. Symmetrical Auxiliary View:
If the auxiliary view lies uniformly on both sides of the reference line, then it is called Symmetrical Auxiliary Views.
2. Unsymmetrical Auxiliary View:
If the auxiliary view does not lie uniformly on both sides of the reference line, then it is called Unsymmetrical Auxiliary Views.
There are two types of Unsymmetrical Auxiliary View:
i. Unilateral View.
ii. Bilateral View.
i. Unilateral View:
If the auxiliary view lies completely on one side of the reference line, then it is called Unilateral View.
ii. Bilateral View:
If the auxiliary view lies on one side of the reference line unsymmetrically, then it is called Bilateral View.
Types OF Auxiliary View:
The name of auxiliary views are given according to the inclined lines in the principal plane.
For example, if the inclined surface is seen in the frontal plane, then such an auxiliary view will be called Frontal Auxiliary View.
If the inclined surface is seen in the top plane, then such an auxiliary view will be called Top Auxiliary View.
Similarly, If the inclined surface is seen in the profile plane, then such an auxiliary new will be called Profile Auxiliary View.
Classification of Auxiliary View in respect of inclined lines is as follow.
1. Primary Auxiliary Views:
Such View which is perpendicular to one principal plane and makes the inclined view with the other two principal planes is called Primary Auxiliary View.
There are three types of Primary Auxiliary View due to three principal planes as follows:
i. Front Auxiliary View.
ii. Top Auxiliary View.
iii. Side Auxiliary View.
2. Secondary Auxiliary Views:
Such Auxiliary View which is prepared in such a plane which is not perpendicular to any of the principal planes is called Secondary Auxiliary Views.
Such a view is formed when the inclined surface of the object is neither parallel nor perpendicular with any of the principal planes.
Such an auxiliary is called Double Auxiliary view.
Drawing OF Auxiliary Views:
Auxiliary views are named after the name of the plane with which the inclined surface of the object is perpendicular.
While drawing, it is attached to the frontal plane.
If the inclined surface is perpendicular to the top plane, then such an auxiliary will be called Top Auxiliary Views.
While drawing, it is attached to the top plane.
Similarly, if the inclined surface is perpendicular to the profile plane, then such an auxiliary will be called Profile Auxiliary Views.
While drawing, it is attached to the profile plane.
At the time of drawing an auxiliary view, the detail of its inclined surface is shown only.
The detail of all other parts seen in the plane is ignored.
Such an auxiliary is called Partial Auxiliary Views.
If the complete view is prepared, this is not more clear.
In this way, the detail representing in the auxiliary plane creates ambiguity for the view of the principal plane.
Therefore, the complete auxiliary views are not prepared.
To prepare an auxiliary view, the length and other detail about auxiliary views are obtained by taking projections from the inclined surface.
Whereas, breadth and other detail are obtained from other views like Side View, Top View, for the completion of the auxiliary views.
Read Also: Building Drawing and Its Types. [A Comprehensive Guide].

I am aware of primary, secondary, and tertiary auxiliary views which are used to describe surfaces which are angled in one, two or three planes.
Is it possible that we ever have requirement of a fourth auxiliary projection in order to describe an inclined feature?
Thanks
Can I helping me with the drawing principal view of the auxiliary view